
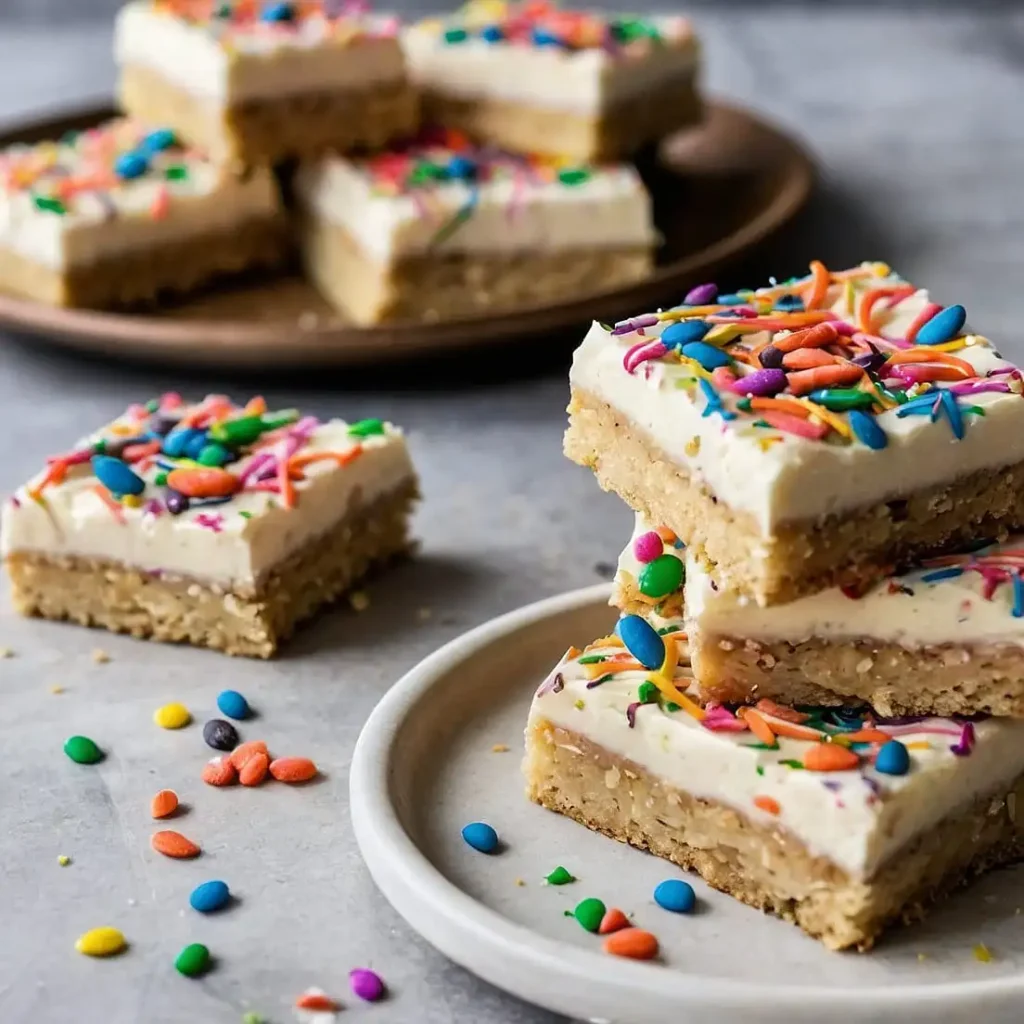
When it comes to simple yet festive desserts, this no bake birthday cake bars recipe stands out as a winner. These vibrant bars capture the joy of a classic birthday cake without requiring an oven. With minimal effort, you can create a sweet treat that’s perfect for any celebration, snack, or indulgence. Packed with colorful sprinkles, a chewy base, and a creamy chocolate topping, these bars are a true crowd-pleaser.
The charm of this no bake birthday cake bars recipe lies in its simplicity. Unlike traditional cakes that demand precise baking and decorating, these bars are easy to assemble and customize. Whether you’re making them for a party, treating yourself, or experimenting with healthier variations like birthday cake protein bars, this recipe is as versatile as it is delightful.
In this article, we’ll walk you through every step of crafting the perfect no bake birthday cake bars recipe, sharing tips, variations, and all the details you need to ensure success. By the end, you’ll have a dessert that looks impressive and tastes even better.
Table of Contents
1. Why No Bake Birthday Cake Bars Are the Perfect Dessert
Desserts should be as enjoyable to make as they are to eat, and this no bake birthday cake bars recipe delivers on both fronts. With minimal ingredients and no baking involved, these bars are perfect for beginners and seasoned bakers alike.
Convenience at Its Best
The hallmark of this no bake birthday cake bars recipe is its ease of preparation. There’s no need to worry about preheating ovens, timing bakes, or achieving a perfect crumb. Instead, you’ll have a delightful dessert ready to chill in just a few simple steps.
Universally Loved
Everyone loves the nostalgic flavor of birthday cake, and these bars deliver it in a fun, portable format. From kids’ parties to adult gatherings, this no bake birthday cake bars recipe is always a hit. The sprinkles and creamy layers add a playful touch that appeals to all ages.
Adaptable for Every Occasion
What makes this no bake birthday cake bars recipe so special is its versatility. Whether you want to create a healthier version like cake protein bars, adapt it for a vegan diet, or keep it indulgently classic, this recipe is a blank canvas for your creativity.
2. Essential Ingredients for No Bake Birthday Cake Bars Recipe
The success of this no bake birthday cake bars recipe lies in using simple yet flavorful ingredients that come together harmoniously.
Main Ingredients
- Graham Crackers or Digestive Biscuits (2 cups, finely crushed): These provide the base for the bars, adding a slight crunch and a touch of sweetness.
- Unsalted Butter (½ cup, melted): The butter binds the base together and ensures a rich, chewy texture.
- Sweetened Condensed Milk (1 can, 14 oz): This adds creaminess and sweetness to the recipe.
- Vanilla Extract (1 tsp): Enhances the birthday cake flavor in this no bake birthday cake bars recipe.
- Sprinkles (½ cup): Essential for the festive look and feel of birthday cake bars.
- White Chocolate Chips (1 cup, melted): Used to create the creamy topping that completes the bars.
Optional Ingredients
- Vanilla Protein Powder (1-2 scoops): Ideal for turning these into birthday cake protein bars for a healthier option.
- Coconut Cream: A dairy-free alternative to sweetened condensed milk for vegan adaptations.
- Chopped Nuts: For added texture and flavor, nuts can be folded into the base mixture.
Ingredient Tip: Use high-quality white chocolate chips and sprinkles that retain their color for the best results in this no bake birthday cake bars recipe.
3. Tools and Equipment for Making Birthday Cake Bars
Creating the perfect no bake birthday cake bars recipe is easier with the right tools at hand:
- Mixing Bowls: For combining the base ingredients and melting the chocolate.
- Spatula or Wooden Spoon: To press and spread the mixture evenly.
- 9×9-Inch Baking Pan: Lined with parchment paper for easy removal.
- Microwave-Safe Bowl: For melting the chocolate topping without burning.
- Measuring Cups and Spoons: Ensures precision for consistent results.
Pro Tip: If you don’t have a microwave, use a double boiler to gently melt the chocolate for this no bake birthday cake bars recipe.
4. Detailed Step-by-Step Instructions for No Bake Birthday Cake Bars Recipe
Step 1: Preparing the Base
- Crush the Graham Crackers: Start by placing graham crackers in a food processor and pulse until they resemble fine crumbs. If you don’t have a processor, crush them manually in a sealed zip-top bag using a rolling pin.
- Mix the Ingredients: In a large mixing bowl, combine the crushed crackers, melted butter, and sweetened condensed milk. Stir until the mixture is sticky and holds together when pressed. This step is critical for ensuring the base of your no bake birthday cake bars recipe is sturdy and cohesive.
Step 2: Adding Sprinkles and Toppings
- Fold in the Sprinkles: Gently fold half of the sprinkles into the base mixture to add color and texture. Be careful not to overmix to avoid color bleeding.
- Prepare the Topping: Melt the white chocolate chips in a microwave-safe bowl, stirring every 15 seconds until smooth.
Step 3: Shaping, Setting, and Slicing
- Press the Base into the Pan: Line a 9×9-inch baking pan with parchment paper. Transfer the base mixture and press it evenly using a spatula or the back of a spoon.
- Add the Chocolate Topping: Pour the melted white chocolate over the base and spread it evenly with a spatula. Sprinkle the remaining sprinkles on top while the chocolate is still warm.
- Chill the Bars: Refrigerate the pan for at least 2 hours, allowing the bars to set properly.
Step 4: Slice and Serve
- Remove from the Pan: Use the parchment paper overhang to lift the bars out of the pan. Place them on a cutting board for slicing.
- Cut into Bars: Use a sharp knife to cut the mixture into evenly sized squares or rectangles, ensuring each bar showcases the colorful sprinkles.
5. Tips for Perfecting Your No Bake Birthday Cake Bars Recipe
- Chill Completely: Ensure the bars have chilled thoroughly in the refrigerator before slicing. This helps achieve clean edges and prevents crumbling.
- Use Fresh Sprinkles: Old or low-quality sprinkles can bleed or lose their color during mixing. Invest in fresh, vibrant sprinkles for the best results.
- Customize the Topping: Add a drizzle of dark chocolate or sprinkle chopped nuts over the white chocolate layer for added flair.
6. Creative Variations: Protein Bars, Vegan Options, and More
Protein Bars Birthday Cake Style
Add 1-2 scoops of vanilla protein powder to create birthday cake protein bars, turning this dessert into a post-workout treat.
Vegan Birthday Cake Bars
Use coconut oil in place of butter and sweetened condensed coconut milk for a dairy-free alternative. Vegan sprinkles and chocolate ensure the recipe stays plant-based.
Holiday-Themed Bars
Change up the sprinkles to match seasonal themes, such as red and green for Christmas or pastel colors for Easter.
7. Serving Suggestions: Making It a Showstopper
While these bars are already delightful on their own, a few thoughtful touches can elevate their presentation and make them the star of any table.
Serve Chilled
These bars taste best when served cold, straight from the refrigerator. The firm texture and creamy topping are especially satisfying when chilled. For summer parties, consider serving them on a chilled platter to keep them cool in warmer weather.
Pair with Beverages
Complement the sweetness of the bars with drinks that balance the flavors. A glass of cold milk, a warm cup of tea, or even a frothy latte pairs beautifully with the creamy and chewy textures. For adult gatherings, a glass of champagne or a fruity cocktail adds a touch of sophistication.
Add a Whipped Cream Dollop
For an extra indulgent treat, top each bar with a dollop of whipped cream and a sprinkle of colorful sugar. This small addition makes the bars look as festive as they taste.
Use Decorative Wrapping for Gifting
Wrap individual bars in parchment paper and tie them with a colorful ribbon for a charming homemade gift. These wrapped treats are perfect for party favors, holiday gifts, or just a thoughtful surprise for friends and family.
8. Storage and Reheating Guidelines
Proper storage is essential to maintaining the freshness and texture of your no bake birthday cake bars recipe. Here’s how to store and enjoy them long after they’re made:
Storing in the Refrigerator
Place the bars in an airtight container and store them in the refrigerator for up to one week. Layer parchment paper between stacked bars to prevent them from sticking together.
Freezing for Longer Storage
To freeze the bars, wrap each one individually in plastic wrap and place them in a freezer-safe bag or container. They can be stored in the freezer for up to three months. Thaw the bars in the refrigerator overnight before serving.
Reheating or Softening
If you prefer your bars slightly softer, let them sit at room temperature for about 10-15 minutes before serving. This step is especially helpful if the bars have been stored in the freezer.

9. Conclusion: Why You’ll Love This Recipe
This no bake birthday cake bars recipe is more than just a dessert—it’s a celebration of simplicity, flavor, and fun. Whether you’re making them for a birthday, a casual get-together, or just to satisfy a sweet craving, these bars are a guaranteed hit. Their vibrant sprinkles, creamy textures, and versatility make them a standout choice for any occasion.
Beyond their festive appearance, these bars offer a level of customization that allows you to cater to any dietary need or flavor preference. Whether you’re creating a healthier version with protein powder, adapting the recipe for vegan friends, or simply indulging in the classic version, this recipe delivers on all fronts.
So gather your ingredients, follow the steps, and enjoy the process of crafting a dessert that’s as delightful to make as it is to eat. With every bite, you’ll taste the love and creativity that went into making these bars a reality.
“Desserts should bring joy, not stress. This no bake birthday cake bars recipe does just that—making every day feel like a celebration!”
10. FAQ: Your Questions Answered
1. Can I use a different type of chocolate for the topping?
Absolutely! While white chocolate is the classic choice for this recipe, you can experiment with milk or dark chocolate for a richer flavor.
2. How can I make these bars healthier?
Substitute sweetened condensed milk with coconut cream and use a natural sweetener like honey or maple syrup. Adding protein powder also makes them a nutritious snack.
3. Are these bars suitable for kids?
Yes! Kids love the colorful sprinkles and sweet flavor. Just ensure the ingredients, such as sprinkles and chocolate, are age-appropriate.
4. Can I make these bars in advance?
Yes, these bars can be made up to three days in advance and stored in the refrigerator. They’re a great make-ahead dessert option.
5. How long do these bars take to set?
The bars need at least two hours in the refrigerator to firm up properly. For best results, chill them overnight.
6. What’s the best way to serve these bars at a party?
Slice them into small squares or rectangles and arrange them on a decorative platter. You can also place them in colorful cupcake liners for easy serving and a festive touch.
7. Can I add mix-ins like nuts or dried fruit?
Definitely! Chopped nuts, dried cranberries, or even mini marshmallows can be folded into the base mixture for added texture and flavor.